Welcome to RapidDashboard
Box Setup Guide
Follow these five steps to get your AI RapidDashboard services up and running. At any point you'd like live assistance, call us at 608-783-8324 and we'll walk you through it.
📞 608-783-8324Unboxing & Power On
- Remove the computer from the welcome box and unwrap all packaging material.
- Place the computer near an ethernet port: on a desk or in the server room near a network switch is ideal.
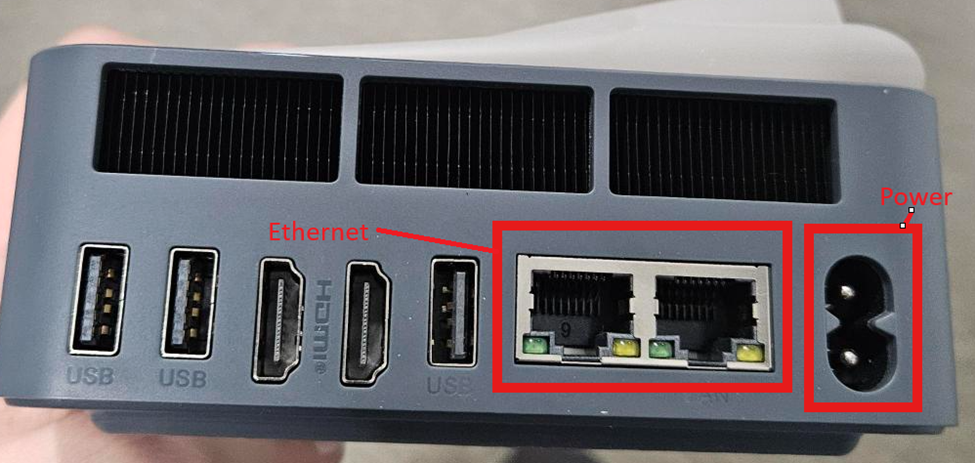
- Plug the ethernet cable and the power cable into the ports labeled in the image below.
- Press the power button on the front of the device to turn it on.
- Once powered on, you should see indicator lights glow on the ethernet ports on the back of the device. Physical setup is complete.
Send Us Your SSH Public Key
Before you can connect, we need to authorize your Windows PC to reach your RapidDashboard box. We do that with an SSH public key: a short, harmless piece of text that lives on your PC and acts like a tamper-proof ID card.
How to get your SSH Public Key (Windows)
1. Check if you already have a key. Open PowerShell (press the Windows key, type PowerShell, hit Enter) and run:
Get-Content ~\.ssh\id_*.pubIf it prints a line that starts with ssh- (for example ssh-ed25519 AAAA…), you already have a key. Skip to step 3.
2. If the command came back empty, generate a key. Still in PowerShell, run:
ssh-keygenPress Enter through all three prompts (accept the default location, leave the passphrase blank). You'll see a small ASCII art "randomart" image when it finishes. That's success.
3. Copy your public key. Run the first command again:
Get-Content ~\.ssh\id_*.pubSelect the entire output (it starts with ssh- and usually ends with your Windows username and PC name) and copy it.
4. Send it to us. Email the copied text to your RapidDashboard coach, or call 608-783-8324 and we'll take it over the phone. We'll install it on your box and tell you when you're cleared to connect.
ssh-keygen isn't recognized? You're on an older Windows build that needs the OpenSSH client enabled. Open Settings → Apps → Optional features, click Add a feature, search for OpenSSH Client, and install it. Or just call us and we'll handle it on a screen share.
Connect to Your Device (Cursor)
Cursor is the AI-powered tool used to interact with your RapidDashboard box. Install it on the Windows PC you'll be working from.
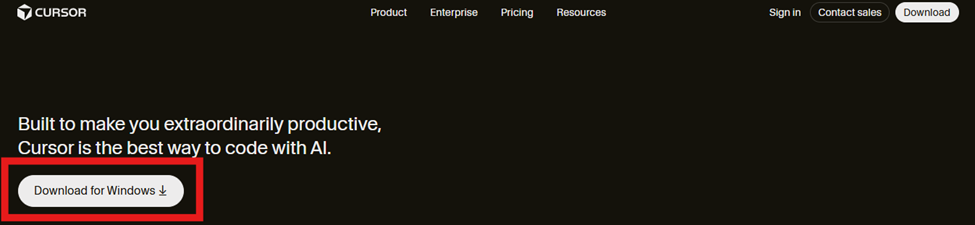
- On that PC, open a web browser and navigate to cursor.com.
- Click the Download for Windows button on the homepage (shown below).
- Run the installer and open Cursor once it finishes.
- Sign in or create a free account when prompted.
Open your box in Cursor
Once Cursor is installed and your SSH key (Step 2) is on file with us, we'll give you your box's address. It follows the pattern
dev.<your-client-code>.aibmm.ai.
Fill in the form below and we'll build the one-click Cursor link for you.
Clicking Open in Cursor launches the Cursor app and connects it to your box over SSH using the key you sent us. The first time you connect, Windows may ask permission to open Cursor. Click Allow.
Build Your First Dashboard
Once connected to the box in Cursor, building a dashboard is as simple as describing what you want to see in plain English.
- Open Cursor and confirm you are connected to the RapidDashboard box (the remote name appears in the bottom-left corner).
- Open the Chat panel (keyboard shortcut: Ctrl + L).
- Type a plain-English question about your data. For example:
"Show me sales by region for the last 12 months" - RapidDashboard generates the dashboard. Review the charts and KPIs that appear.
- Save or pin the dashboard so it is ready next time you open Cursor.
Data Connections
To pull live numbers into your dashboards, RapidDashboard needs to connect to your data sources. There are three common connection types:
API
An API is a secure, automated link to a system you already use: QuickBooks, Salesforce, BambooHR, and hundreds more. RapidDashboard pulls fresh numbers on a schedule with no manual export required.
CSV
A CSV is a spreadsheet file (exported from Excel, Google Sheets, or any software). Drop it into RapidDashboard and we'll chart it immediately. Best for one-time uploads or systems without an API.
SQL
A SQL connection reads directly from your database in read-only mode. Best when your numbers live in a custom application or data warehouse. No risk of accidental edits to your data.
Connections are the trickiest step. We've got you.
Call us and we'll walk through your specific systems on a screen share. Most connections take under 15 minutes.
Need help at any step?
Our team is ready to walk you through every part of the setup, from physical installation to your first live dashboard. Just call.
📞 608-783-8324